Monday, October 28, 2013

BEATEN INTO SUBMISSION

Battered and worn I stagger to the finish line :)

It's been great, but gruelling towards the end and the inevitable feelings of anti-climax.  "I could have done so much more ..."   So what have I done ?  Like Columbus' third voyage, my third pumpkin journey builds upon the experience of the first two.


  • 2011  Carve a Pumpkin  (Halloween Head)
  • 2012  Assemble a Witch  (Halloween Head)
  • 2013  Populate a Parallel World  (Halloween inside your Head ?)


  • 2011   invert the product (Pumpkin=Doric Column)
  • 2012  invert the process  (Carve on Vegetable=Assemble Many)
  • 2013  invert the viewpoint (up = down)


The purposes are many.  

  • Push the boundaries of what I can model in Revit (both Vanilla and Point World)
  • Blur the distinction between BIM and ART
  • Interact with a community of all-round good guys
  • Ponder the meaning of the universe
I chose to explore more directly the analogy between Parametrics and DNA, Dialogue boxes as clusters of Hox Genes telling an embryo to "grow a leg here", or "make an eye now"


Last year I was inspired by Arcimboldo, sixteenth century court painter to the Habsburgs of Vienna & Prague.  This year I chose MC Escher, a long time hero of mine :  player of mind games, consummate craftsman, explorer of the porous boundary between "paper space" and "model space".

Come into my world.  Zoom in, float around, lose yourself.

I am uploading Revit files to Autodesk 360.  You can log in and view them.  Use Firefox or Chrome (Maybe IE11?) to use the interactive view and orbit around my imaginary worlds.

Links:

Another World on Autodesk 360

Infinite Fish on Autodesk 360

Still Life Street on Autodesk 360


Sunday, October 27, 2013

HAND ME DOWNS

Truth is, I'm running out of time.  Have to be ruthless now, try not to get flustered.  The familiar feeling of having bitten off a little too much.


I have to attach the hands/feet/paws/claws/hooves/wings to the ends of the limbs.  We have a rung, let's host another point on it, ultimately this can be controlled by the existing ankle position parameter, but for the moment let's keep it slightly away so we can see what we are doing


The point itself has a built in rotation parameter but that will only rotate us around the rung.  So let's place a circle on one of the planes, hang a rung across this and attach the paw.


That's effective enough, but I'm getting worried about controlling all these knuckle positions.


So I decide to rationalise my rig once more.  Two boxes that share an edge.  One diagonal rung, one curved rung.


I think this is probably the right level of simplification


So here is my assembled human.  Just call me Dr Frankenstein.  The rotation parameters come in useful to get the feet pointing forwards.  (always useful in my experience)


Can't get by without a cow and a chicken ...  & if you think there's some text missing in the picture above ... tick,tock ... got to keep going, can't worry about minor details.


I opt for setting up the limb pairs as types within the nested family and having a parameter to load the appropriate type. Working hard on getting my parameters linked up and grouped.


Here are the parameters for a limb-pair.  The left & right paws have separate angle controls. Best I could manage in the time available.


Ant the parameters for the master "Tetrapod" family.  Not yet reached the point where it is fully scalable.


And it is getting a little messy.  Some unpredictable errors popping up at times


I opt for the double nested planting trick to get my families to scale.  I need to move on.


All this nesting and parameter linking is taking it's toll.  Once you have the types set up everything is fine.  You can copy them around and navigate freely.  But when modifying a type or creating a new one it get's REALLY SLOW. Sit and wait for a minute or more while Revit thinks.  I checked out Task Manager.  No problem with RAM.  (actually it's still a pretty small family)  But the CPU has hit a plateau around 20%.  I am guessing that this has to do with Revit not multi-threading and basically my processing power is stretched to the limit. 1 core breaking out a sweat while the others sit back and have a cup of tea


Let's add a tail.  That would be another box rig.  Maybe I am being a bit willful with the rung placement, but actually there is a method to my madness.  The attachment end needs to be relatively square on, while the rest of tail should seem to curve freely in 3d space.


I used elliptical profiles once more.  Need a visibility parameter so as not to embarass my tail-free specimens


We are getting within a week or so of the present now.  (I am reaching the end of my tail)  The intention was to use a circle of beasties to reinterpret one Escher's common themes - metamorphosis.  Animals that come to life out of the paper, oozing out of a tessalated flat sheet into the real world.  Sadly I may not have time to do this one convincingly.


But I will lay down a tesselated floor down for my beasties to dance around on.  Pull out the generic model family from way back.  Nest it into a hexagonal curtain panel by pattern.  Six instances required.  I'm not going to try to make this resizable just now,


Load this into a divided surface.  Make use of a bit of trial and error adjustment to the U & V grid sizes


Hey presto, we have an infinite tesselated plane


Now the Escher work I have in mind has a dodecahedron, maybe a paperweight, sitting on the table.  One of a number of objects that the lizards clamber over on their way to paper space and back

He used polyhedra other regular geometrical solids in several of his works.  So I set myself the challenge of making something a bit like a cuboctohedron in Vanilla Revit.


It was moderately successful and quite parametric.  Several variants possible and it resizes too.


In one of its configurations it comes pretty close to being a close-packing solid.


Would have loved to spend more time playing with this aspect, but we really must get back to the "END PRODUCT"  Which at the moment is 3 Escheresque images.  The infinite fish piece is finished.  But the other 2 need a good deal more attention.  Let's start with the Still Life Street.  The books were looking a bit blank & I got the idea of making a halloween connection via their titles.  Why not use Philip Chan's trick of the face-based model text family that cuts into another.

Interesting thing about hosted families, even though the host inside the family is just a "stand-in" it's size has a limiting effect.  If you want to make a really big door or window, you may need to stretch the wall inside the family so that there is still something left.

I was very puzzled when I first came across this.  You make a window that works fine for ages and ages, then suddenly you decide to make a really big one and everything goes wrong.  I suppose you could lock the wall to ref planes so that it automatically grows with the opening.

I had this same issue with a face based family for placing grooved titles on my book covers.


It's a face-based family with model text that is inset into the extrusion.  Use "cut" and have a parameter to turn off the text.


I also made a face-based family that cuts a rectangular groove of variable size.  This allows me to paint panels in the book covers with different materials.


Add a few bits and pieces from my various adventures and give it a render.  Layer things up in Sketchbook to enhance the image.  And finally back to Another World to do the same kind of thing.


I spent my last available weekend writing up these two mammoth posts and further embellishing these two "impossible worlds"  I had hoped to also tackle the circle of beasties/tesselation idea, but time ran out on me.

So just one post to go.   Tomorrow I will present my final images, clean up the files a bit, upload a package and reflect a little on my successes & failures.

DIGITAL DIGITS

Life is good.  It's also frustrating, confusing, disappointing, nerve racking ... that's what makes it so good, the ups and the downs (did I forget to list the ups :)

Friday, 3.30 am.  I arrived home for the weekend about 7 hours ago, pretty much exhausted from another hectic week.  Just fell asleep.  Now I am up and buzzing with the excitement and uncertainty of having 2 days to pull all this stuff together into a coherent pumpkin submission.

My younger son Tom is in the air, on his way to California to meet up with my older son Joe, grandson Jack & daughter-in-law Yanela.  My daughter Wendy will hop across from New York to join them for the weekend.  I toyed with the idea of making the trip, but it didn't work out.  What's that phrase ?  Global is the new local ... something like that.

This stuff is from the long Eid break, starting a couple of weeks ago.

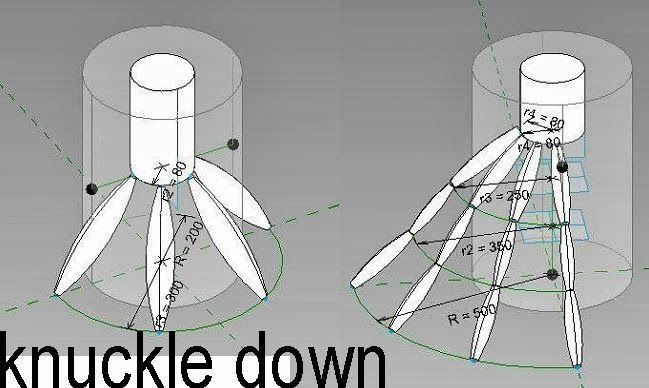
I need to build some hands.  The arms are cylindrical so why not start the hand that way.  I call this my "tin can rig"  A bit simpler than a box.  For once those annoying seams that Revit makes came in useful :)  I can hang rungs on them.


Now we can cast out some arcs that host remeaters for my nuckles.  Bring back the 4 point cigar from my first attempt at a leg.  Not a bad start, but surely the finger length should vary.


Perhaps I need the ellipse again.  Not sure what to call this rig.


Seems to have a lot of potential.  Need to make space for the hand/foot part that mediates between forearm and digits.


I end up with some fairly convincing hands and feet, but looking closer, the hands are not quite right.  I think I need a simpler shape with the ability to change its angle.


So now I have a 2 part rig.  Two boxes, one with a curvy side.  Join them together along one edge.


This set-up works well with a rectangular profile for the upper portion and cylindrical digits.  It can go flat for a human foot or slim and vertical for a bird.


Nest these into another family and try out pairs.  Feeling better about this now.


Try them out at the end of some limbs.


Add the appropriate heads.  These & the hands/feet are still loose objects awaiting integration into the bodies.  Definitely making progress though.


OK but maybe it's time to make some better eyes


The insertion point will be the centre of the skull.  Lock a ref line to the intersection of the planes.  Give it an angle parameter. The orbit radius of the eyes will be linked to the radius of the skull.  


So I'm assembling the head family.  Nest the eyes and the jaw into the egg.  Link up the parameters so they will all scale together.  The eyes will rotate around into different positions.


Now for the face.  The idea is to boil everything down to one length parameter and some numerical factors that will allow me to vary the proportions of everything else.


So now I have a head family that parametrically transforms itself into 4 reasonably successful abstractions of different vertebrates.


By the way I just have to mention the fun I am having using Revit to manage and assemble my screen clips.  Why didn't I think of this before ?  It's so much faster & friendlier than using graphics software. Note my references to Mondriaan, a compatriot and contemporary of Escher. (actually about 25 yrs older)


We need a neck.


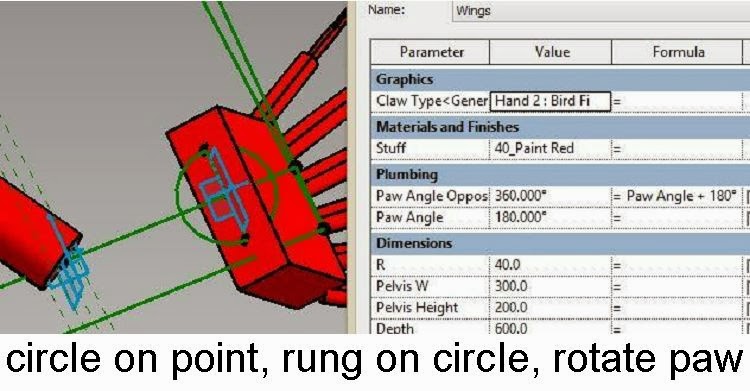
That's fine but for the fish at least the head must be able to rotate relative to the neck.  I can draw a line across the end circle of the neck using 3d snapping.  Place a point on this and host my head on this point.  The point will automatically have a rotation parameter because that's how point world works.


To make it a little easier to select that plane I have created a small circular surface on it. Now the fish & the croc look much better & I have also rotated the other heads a little.


I have now reached the point that I called the middle of the journey in my first post: the point at which I began to tell my storey.  I decided to place a loose eyeball and render the image which is captured on its shiny, reflective surface.  This is a precursor to the distorting mirror images.  It's inspired by Escher but also made me think of Magritte who hails from neighbouring Belgium & was born in the same year.

About half way through that post I show my "home office".  I played a little game where I was taking notes on my surface and swapping images back & forth between surface and laptop.  I was also having a serious play with Sketchbook Designer which has really come into its own since I bought a touch screen laptop.  Windows 8 rules by a merry mile IMO.  Note the recursion of images, like bouncing back and forth between mirrors.  (need to crank up the max number of reflections in settings if you want this to work in a Revit render)


So now I am referencing Magrittes famous "this is not a pipe" painting. Check back to the first post "this is not a serious building" (could have been this is not the ANC HQ)

At first sight you think it’s a play on words. Of course it's a pipe, what else.  Then you realise its not a pipe, it’s a painting. Not even a painting of a pipe . It's a double nested Illusion.  Dream within a dream

There is a danger of thinking a Revit model is not a diagram
"We don’t draw any more we build real buildings inside the computer". Oh yes ?  Just like magritte who paints real paintings of real pipes on the surface of his canvas.  This is not a building. It’s a screen capture, of a view, generated from a database, abstracted into the form of electrical impulses.

We are tempted to believe that more is better. More data, more realism, more 3D.  Consider a scientific model.  Is more better? Should you include more variables? Will that lead to deeper understanding. Actually not. We need to simplify, isolate variables, abstract the problem to achieve meaningful results.


Back to the pipe.  We start with a plumbing pipe.  I used to have something like this back when I was a bricklayer.  All jumbled up in my tools looking innocent.  (I was young)


The copper pipe with the flattened end needs to be made in point world.  I'm using the ellipse profile again here.  The cylindrical portion of the pipe is not perfect (just like the real world)


Now you can nest Vanilla families into Point World, but not vice versa.  Aha, but perhaps there is a way around this in futuristic Revit 2014.


Sure enough you can export it as a solid (Acis SAT) bring this back as a CAD import, and explode into a Revit solid.  Now apply materials in the normal way.  It even has shape handles which allow you to pull-push the cylindrical part.  Change the category to planting.  Double nest it.  You have a scalable "notapipe" family.


Now for Magritte's pipe (and/or Escher's pipe as featured in the Still Life Street) it's back to Point World and the good old Rectangular Rig that I showcased in last year's Pumpkin Papers.  There are many posts on my blog that describe how to make these.  You can also check out Vasari Talk no xxx.  It's a piece of Pea by now for me.  Use a profile with a built-in scale factor.  Hook this up to the length of the rectangle.  You have a scalable pipe.  No need for planting tricks.  Even better you can control the proportions.  You could even make a pipe family with 15 different types that mimic the many wierd and wonderful shapes that pipe-makers have evolved over the years.  (Interesting that pipes should inspire such creativity, wonder what they are smoking)


Set up a camera view with my two pipe families and their very different approach to scaling.  add a bit of model text just for fun (and to fill up some empty space)  Render & export.  Also export a realistic view & a hidden line view with ambient shadows only.  All 3 to the same resolution.  Drag these into Sketchbook Designer.  One bonus of working for a practice that can't quite kick the Autocad habit is that they have to buy the BDS.  Hence we all get Navis and Sketchbook which they might balk at paying for otherwise.


Enter my Wacom Bamboo pen.  Do a bit of scribbling on screen.  Drag in some Magritte vignettes.  Hit the symmetry button.  Voila.  Ceci c'est une autre image whimsical.